15 Easy Coffee Bar Ideas for Small Spaces Space Saving
- Coffee Station Ideas
 Alina
Alina- 0
- 49 minutes read

Look, I get it. You’re living in a shoebox apartment, your kitchen counters already resemble a Tetris game gone wrong, and yet—you still dream of having your own coffee bar. You know, that Instagram-worthy corner where your French press sits pretty and your mugs hang like art pieces? Yeah, I’ve been there, desperately shuffling appliances around at 6 AM just to make room for my morning brew ritual.
Here’s the thing: you don’t need a sprawling kitchen or a dedicated coffee room (who has those anyway?) to create a functional, gorgeous coffee station. I’ve tested, tweaked, and squeezed coffee setups into spaces you wouldn’t believe, and honestly? Some of my best coffee bar ideas came from pure desperation and a stubborn refusal to give up my caffeine shrine.
So grab your measuring tape and let’s talk about 15 seriously clever coffee bar ideas that’ll work in even the tiniest spaces. No fluff, no impossible Pinterest fantasies—just real solutions that actually fit in real homes.
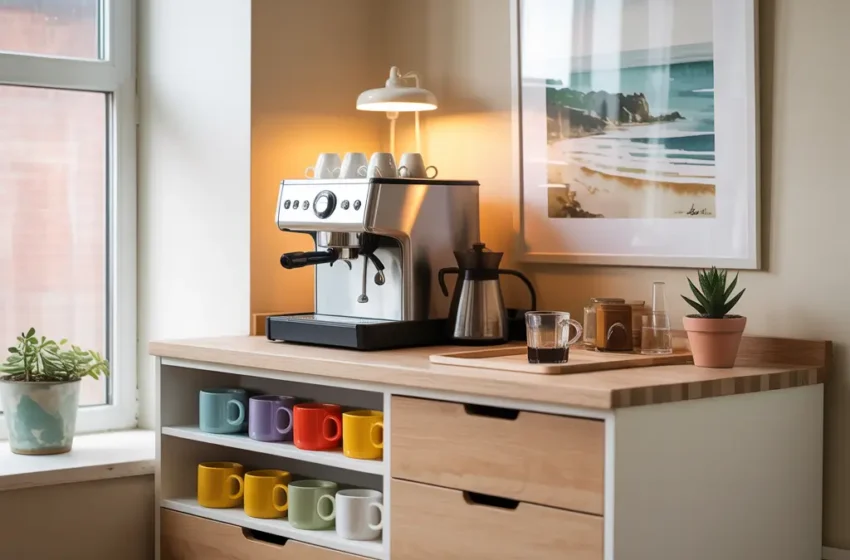
1. Slim Rolling Cart Coffee Bar
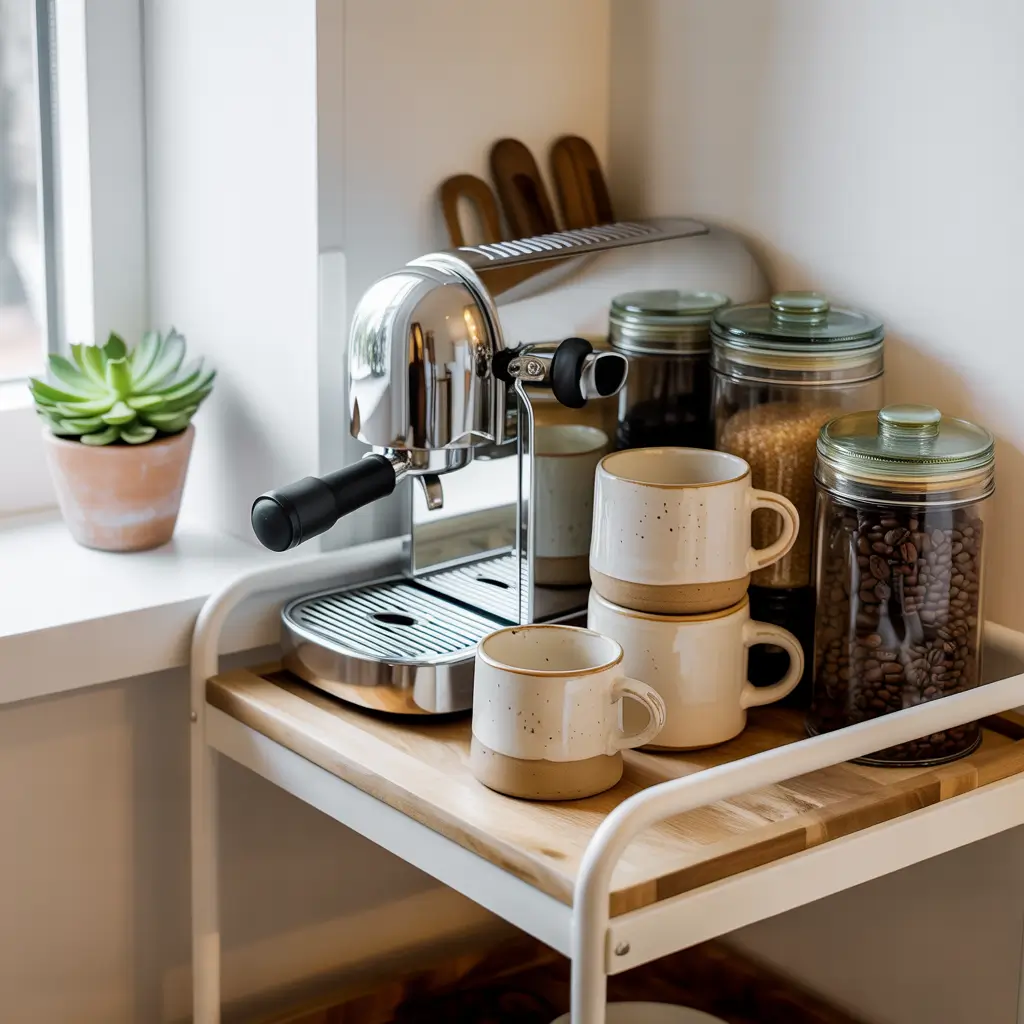
Let me tell you about my first small-space coffee solution—the rolling cart. This bad boy changed my entire morning routine.
Rolling carts are the MVPs of small-space living. You can wheel them wherever you need them, tuck them away when guests come over (you know, to pretend you’re not a caffeine addict), and they typically measure just 12-18 inches wide. I’m talking serious space-saving magic here.
Here’s what makes them work so well:
- Mobility: Roll it next to your coffee maker in the morning, then push it against the wall or into a corner when you’re done
- Multiple tiers: Most carts have 2-3 shelves, giving you vertical storage without eating up floor space
- Versatility: Use the top for your coffee maker, middle shelf for mugs and supplies, bottom for extra beans or backup filters
I keep mine stocked with my espresso machine on top, a cute little container of sugar and stirrers on the middle shelf, and my collection of syrups on the bottom. When I’m making coffee, I pull it right next to my sink for easy water access. FYI, this setup has saved me countless trips back and forth across my tiny kitchen.
The best part? You can find decent rolling carts for under $50. Check out metal mesh ones for an industrial vibe, or grab a wooden bamboo cart if you’re going for that warm, minimalist aesthetic. Just make sure the wheels lock—learned that lesson the hard way when my cart decided to take a solo journey across my slanted kitchen floor. :/
2. Corner Coffee Nook Setup
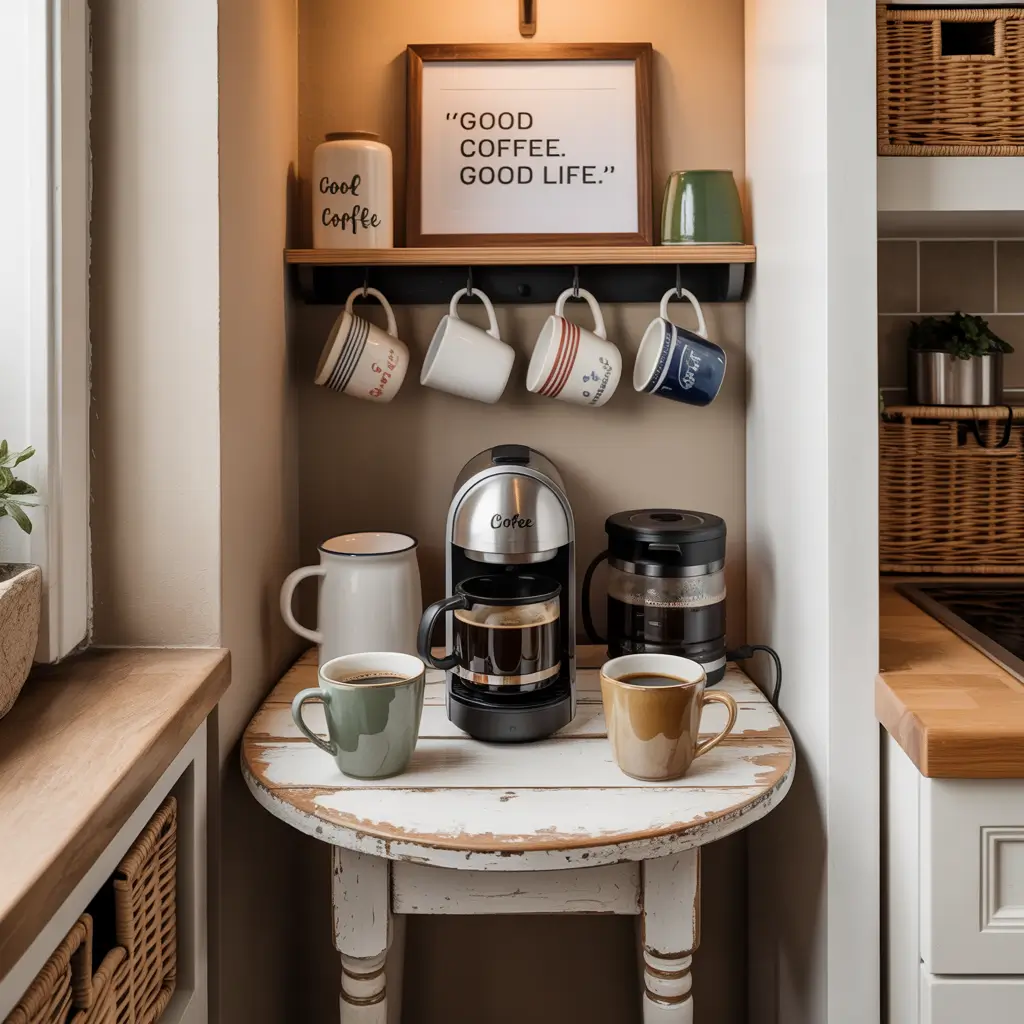
Corners are the forgotten real estate of small spaces. Seriously, when’s the last time you actually used that awkward corner in your kitchen?
I transformed my dead corner space into a fully functional coffee nook, and it’s become my favorite spot in the entire apartment. You’d be shocked how much you can fit when you think vertically and get creative with corner-specific furniture.
Here’s my corner coffee nook strategy:
- Corner shelving units: Install floating corner shelves or buy a corner shelf unit that utilizes the vertical space
- Lazy Susan magic: Place a lazy Susan on one shelf to store all those coffee syrups, sweeteners, and small accessories—spin to find what you need
- Wall hooks: Mount hooks on the adjacent walls to hang mugs, coffee scoops, or even a small hand towel
The genius of corner setups is that they use space you weren’t using anyway. My corner nook houses my pour-over station, a small electric kettle, and about eight of my favorite mugs. I installed two floating shelves stacked vertically, and the whole setup takes up maybe 18 inches of wall space on each side.
Pro tip: Paint the corner a different color or add peel-and-stick wallpaper to make it feel like an intentional design choice rather than a desperate space-saving measure. Nobody needs to know you were working with limited options—make it look deliberate!
3. Floating Shelf Coffee Station

Floating shelves are like the Swiss Army knife of small-space solutions. I’ve used them in every tiny apartment I’ve lived in, and they never disappoint.
The beauty of floating shelves is that they literally float above your existing counter space. You’re not sacrificing any precious counter real estate, but you’re adding storage exactly where you need it. I mounted two 24-inch floating shelves above my toaster area, and boom—instant coffee bar.
Here’s what you need to know:
- Sturdy installation is crucial: Don’t cheap out here. Your coffee maker probably weighs 5-10 pounds, plus your mugs, beans, and accessories
- Spacing matters: I recommend 12-14 inches between shelves so you can actually reach your stuff without playing Jenga
- Mix open and closed storage: Use baskets or containers on the shelves to hide the messy stuff (looking at you, random sugar packets and crumpled filters)
I keep my coffee maker on the counter directly below my floating shelves, then use the shelves for mugs, a cute canister of coffee beans, and my collection of alternative milks. The vertical arrangement makes everything visible and accessible without creating that cluttered countertop chaos.
One thing I love about this setup? You can customize the length and number of shelves based on your exact space. Got a narrow wall space between your fridge and the doorway? A single 16-inch shelf might be all you need. Have a slightly wider area? Go for 30-36 inches and really spread out.
4. Over-the-Counter Mini Coffee Bar
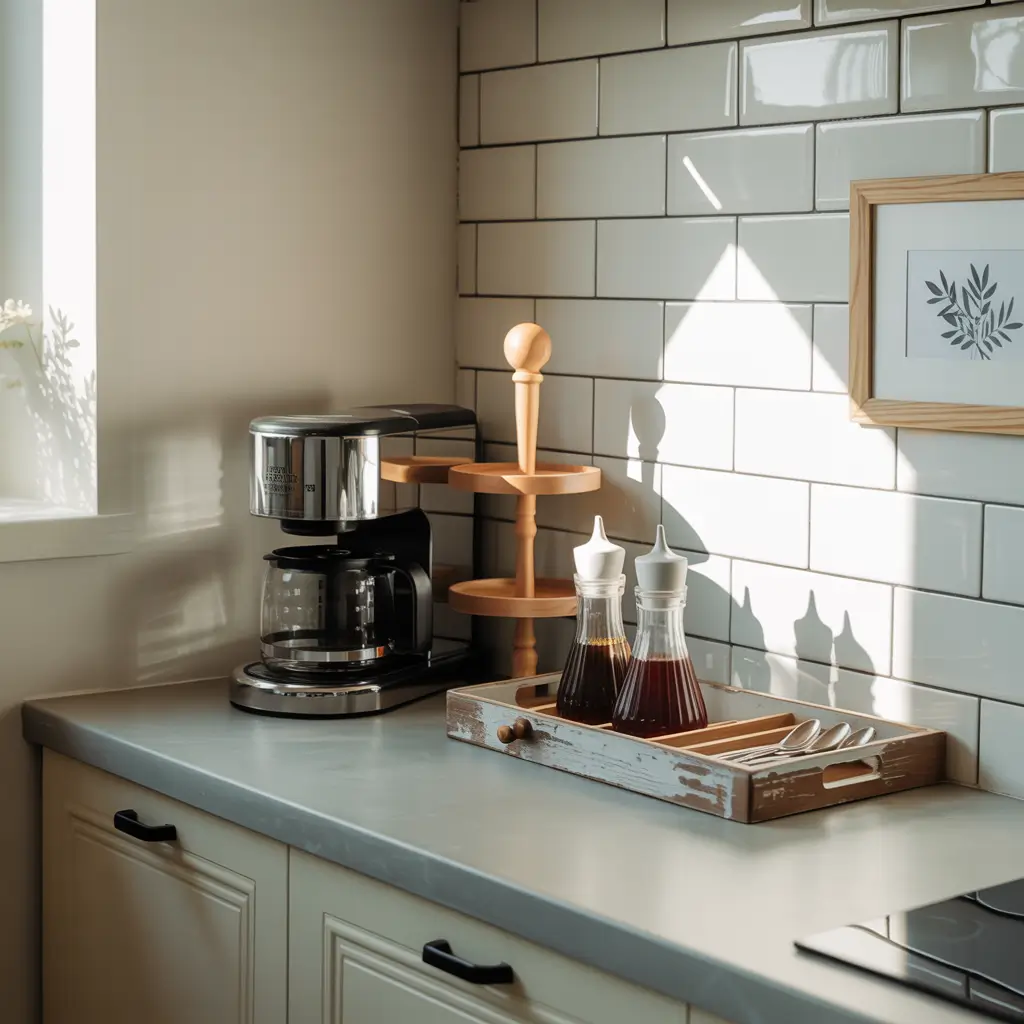
Ever looked at the empty space above your counters and thought, “What if I could use that?” Well, you can, and it’s easier than you think.
Over-the-counter setups are clutch when you literally have zero counter space to spare. I’m talking about utilizing that vertical space between your countertop and your upper cabinets. Most people have at least 18-24 inches of vertical space there, and that’s prime real estate for a mini coffee bar.
Here’s how to make it work:
- Under-cabinet coffee maker: Look for compact coffee makers designed to fit under cabinets—many are under 12 inches tall
- Under-cabinet mug holders: Install racks that mount to the bottom of your upper cabinets to hang mugs
- Adhesive hooks and organizers: Stick these to the underside of cabinets or on your backsplash to hold coffee scoops, towels, or filter holders
I set up my mom’s coffee station this way, and she absolutely loves it. Her counter stays completely clear except for the coffee maker, which sits tucked under the cabinet. All her accessories hang from the cabinet above, so everything’s within arm’s reach but nothing clutters the counter.
The key is measuring carefully before you buy anything. Grab a tape measure and check that vertical clearance—you’d be surprised how many coffee makers are just a smidge too tall. Trust me on this one; I’ve returned my fair share of appliances because I eyeballed it instead of measuring like an adult.
Also Read: 15 Smart Built In Coffee Bar Ideas for Tiny Spaces
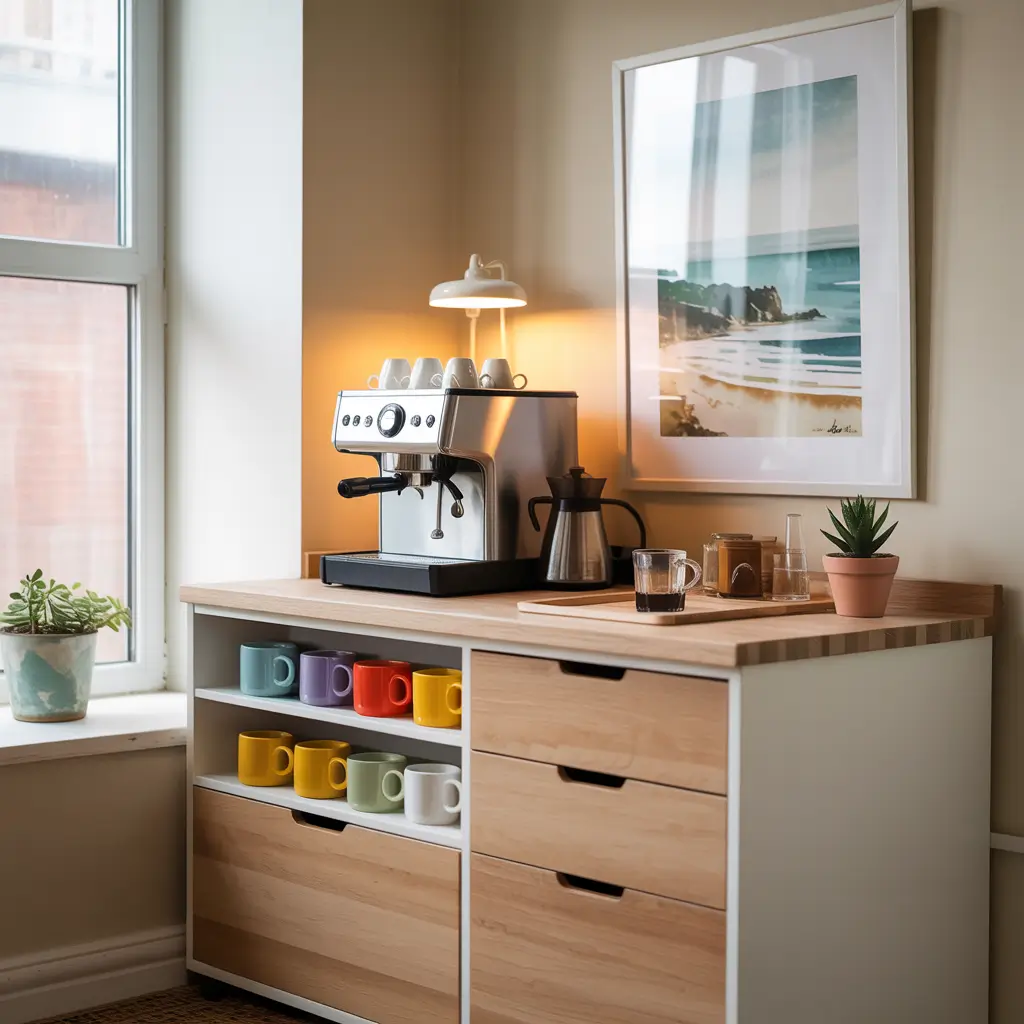
5. Cabinet-Turned Coffee Bar
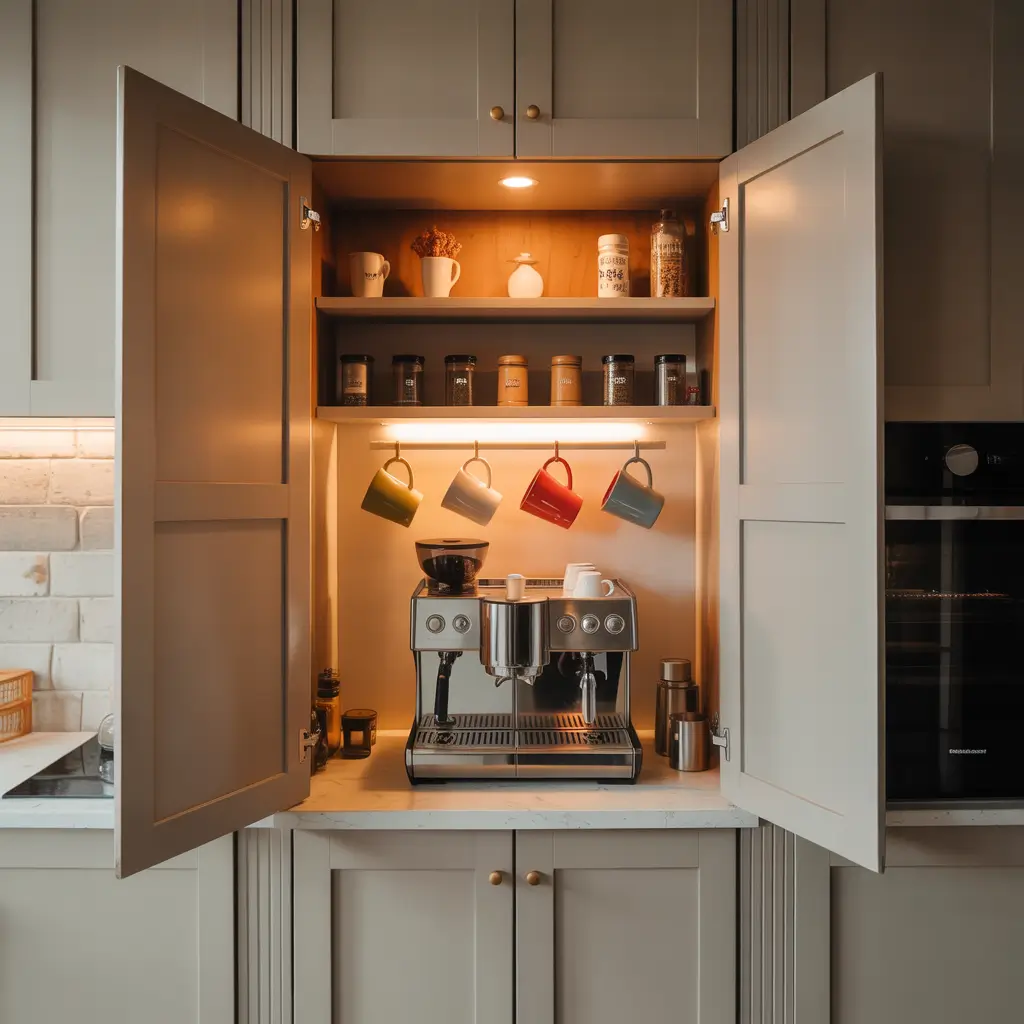
You know that cabinet you’re currently using for random Tupperware you never use? Yeah, let’s talk about that.
Converting an existing cabinet into a dedicated coffee bar is genius-level space optimization. I repurposed a lower cabinet in my last apartment, and it felt like I’d added a whole new room. Everything hidden, everything organized, everything in one place.
Here’s the game plan:
- Choose the right cabinet: Lower cabinets work great if you want a pull-out drawer system; upper cabinets work if you want eye-level access
- Install a pull-out shelf: This lets you slide your coffee maker out when you’re using it, then tuck it back in when you’re done
- Add interior organization: Use shelf risers, small bins, and drawer dividers to maximize the interior space
- Create ventilation: If you’re storing a hot coffee maker in there, drill a few holes in the back for air circulation (or leave the door slightly open while brewing)
My cabinet coffee bar held my drip coffee maker, grinder, all my beans, filters, and about ten mugs. Everything stayed hidden behind a closed door, which made my kitchen look way more put-together than it actually was. IMO, this is the best solution if you’re someone who values a clean, minimalist aesthetic but still wants full coffee bar functionality.
The only downside? You need to actually have a spare cabinet. But honestly, go through your cabinets right now—I bet you’ve got at least one that’s holding stuff you forgot you owned. Clear it out, and you’ve got yourself a coffee bar.
6. Wall-Mounted Fold-Down Coffee Bar
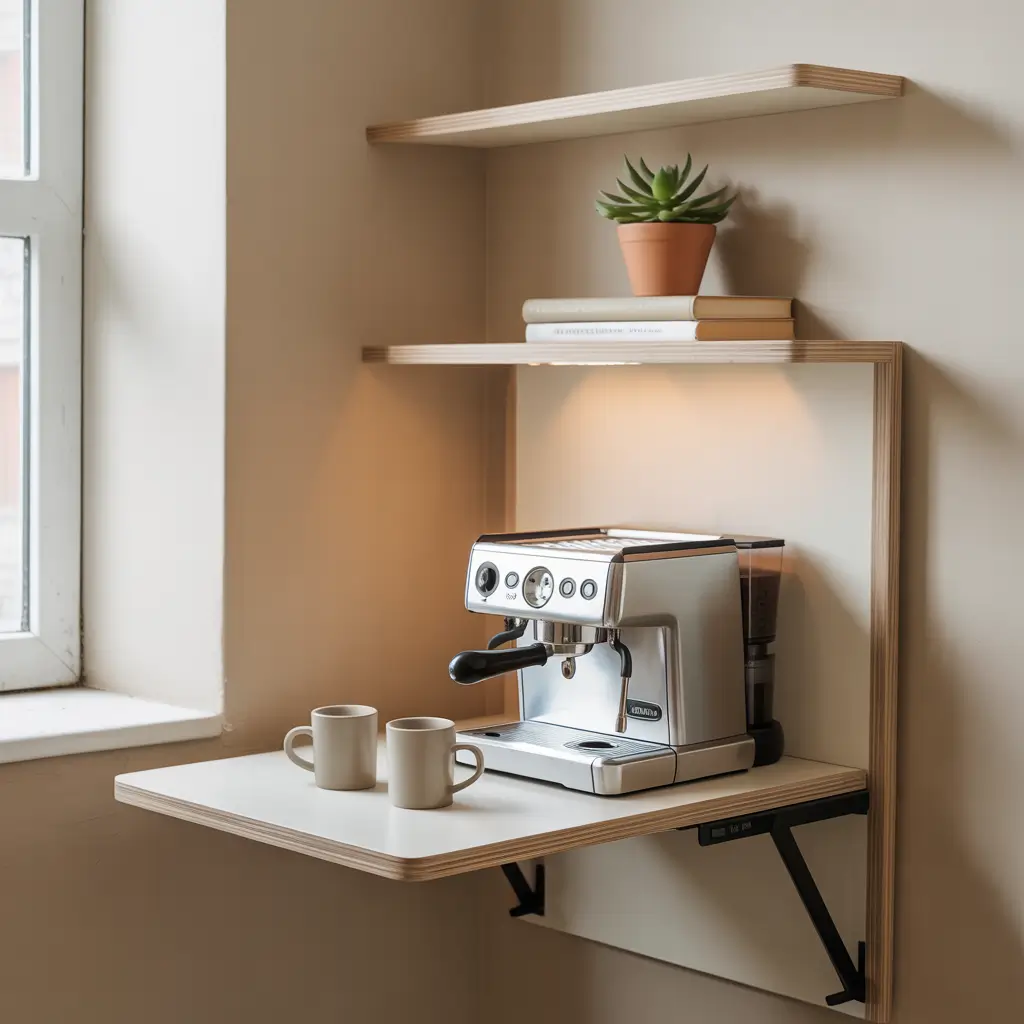
Okay, this one’s for the serious space-saving enthusiasts. We’re talking furniture that literally disappears when you’re not using it.
Wall-mounted fold-down shelves are the transformers of the furniture world. I installed one in my studio apartment, and it blew my mind how much functionality I could pack into basically zero square footage. When I need coffee, I fold down the shelf. When I don’t, it folds flat against the wall and looks like a piece of decorative wood.
Here’s what makes these work:
- Heavy-duty brackets: You need serious hardware here since you’re putting weight on a hinged shelf
- Strategic placement: Mount it at a comfortable height—around 36-40 inches from the floor works for most people
- Compact coffee maker: You’ll want a smaller machine that you can easily lift on and off the shelf
- Hook storage: Add hooks to the wall around the fold-down shelf for mugs and accessories
I used mine with a small French press and electric kettle setup. Every morning, I’d fold down the shelf, make my coffee, then fold it back up and head out the door. The whole operation took up maybe two square feet of wall space when deployed, and absolutely zero floor space when closed.
Fair warning: This setup requires some basic DIY skills and the right tools. You’re drilling into walls and installing heavy-duty brackets. If you’re renting, get landlord approval first. But if you can pull it off? Game-changer for tiny spaces.
7. IKEA Hack Coffee Bar Station
Let’s be real—IKEA basically designed their entire catalog for small-space dwellers and broke college students. And the hacking community? Absolute geniuses.
I’ve built three different IKEA hack coffee bars over the years, and each one cost me under $100. The trick is taking their basic pieces and repurposing them into something way cooler than intended.
My favorite IKEA hacks for coffee bars:
- RÅSKOG cart: This $30 rolling cart becomes an instant mobile coffee station—add some stick-on hooks to the sides for mug storage
- KALLAX shelf unit: Use the cube compartments to organize different coffee supplies—beans in one cube, mugs in another, machine on top
- BEKVÄM spice rack: Mount these wooden spice racks to create tiered coffee storage for syrups, sugars, and small accessories
- LACK wall shelf: At like $7 each, you can install multiple shelves to create a custom floating coffee station
What I love about IKEA hacks is the affordability and flexibility. You can start small with a $20 cart and add pieces as your coffee collection grows. Plus, everything’s designed to look decent together since it’s all from the same design family.
My current setup uses a KALLAX 2×2 cube unit. Top cubes hold my coffee maker and grinder, bottom cubes store beans, filters, and backup supplies. I spent maybe $60 total, and it looks like I paid way more. The internet is loaded with IKEA coffee bar hack tutorials if you need inspiration—trust me, people get creative with this stuff.
8. Vertical Storage Coffee Bar
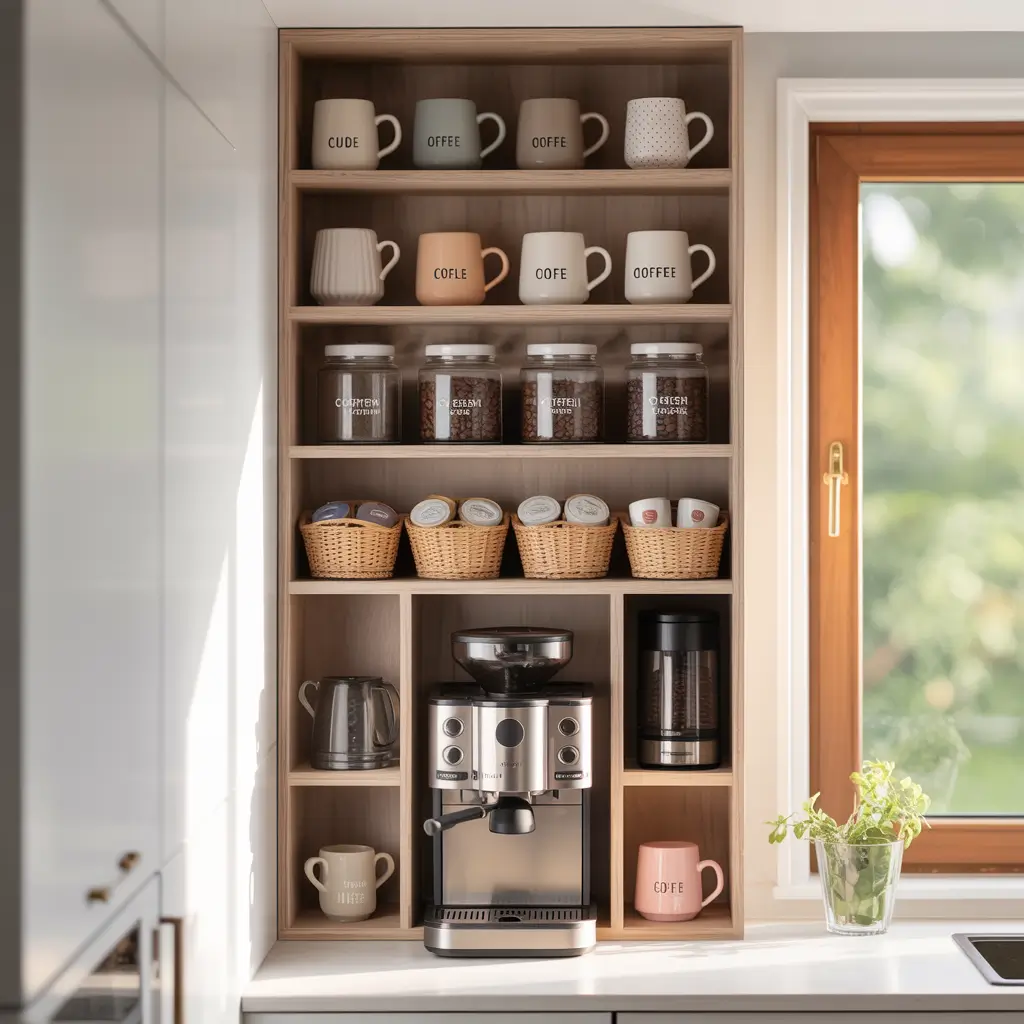
When you’re short on floor space and counter space, the only direction left is up. And honestly? Vertical storage is criminally underutilized.
I built my entire vertical coffee bar on a 12-inch wide strip of wall, and it holds everything I need for my daily coffee routine. The secret is thinking in terms of layers and levels rather than sprawling horizontal setups.
Here’s the vertical strategy:
- Top shelf: Coffee beans in airtight containers—they’re lightweight and don’t need frequent access
- Middle shelf: Coffee maker or your primary brewing method—this should be at a comfortable height (around chest level)
- Lower shelf: Mugs, sweeteners, and daily-use items within easy reach
- Floor level: Backup supplies, extra filters, bulk items in a small bin or basket
I used a combination of floating shelves and a narrow bookshelf (like 10 inches deep) to create my vertical setup. Everything stacks upward instead of spreading outward, which means my entire coffee operation occupies less than one square foot of floor space.
The key to making vertical storage work is keeping the most-used items at the most accessible heights. You don’t want to be reaching up to the top shelf every single morning for your sugar. Put the daily stuff at arm level, and save the high and low spaces for the occasional-use items.
Also? Vertical setups look intentional and stylish. When you arrange things in a purposeful column, it reads as design rather than desperation. Nobody needs to know you’re working with 200 square feet of living space 🙂
9. Coffee Bar Inside Pantry Closet
Your pantry is hiding some serious potential. Seriously, have you looked in there lately?
I carved out a coffee station in my pantry closet, and it’s become my favorite little secret corner. The door hides everything, which means I can be as messy or as organized as I want without it affecting my kitchen’s appearance.
Here’s how to make a pantry coffee bar work:
- Dedicate one shelf: Clear out one shelf at a comfortable height—you’ll build your coffee setup here
- Install a power strip: Run an extension cord into the pantry (hide it along the wall) so you can plug in your coffee maker
- Door storage: Use over-the-door organizers or hooks for mugs, filters, and accessories
- Pull-out tray: If you’re handy, install a pull-out shelf so you can slide the coffee maker out when brewing
My pantry coffee bar keeps everything contained and hidden. I open the door, pull out the little shelf with my coffee maker, brew my cup, then slide everything back in and close the door. Out of sight, out of mind—except when I need it.
The biggest challenge is making sure you have electrical access. Some pantries have outlets nearby; others don’t. I used a flat extension cord that runs under my pantry door (they make these specifically for this purpose), and it works perfectly. Just make sure you’re not creating a fire hazard—coffee maker safety is real, people.
10. Entryway Console Coffee Bar

Who says coffee bars belong in the kitchen? Certainly not me.
I set up a coffee bar on my entryway console table, and guests are always surprised (and impressed) by it. Think about it—that narrow console table by your door is usually just holding mail, keys, and random stuff you keep meaning to put away. Why not give it a real purpose?
Here’s the console coffee bar setup:
- Narrow console table: These are typically 10-14 inches deep, perfect for small spaces
- Compact coffee maker: A single-serve or pour-over setup works great here
- Storage underneath: Use the lower shelf or baskets underneath for beans, mugs, and supplies
- Wall space above: Install a small shelf or hooks above the console for extra storage
My entryway console is 12 inches deep and 36 inches wide. I keep my pour-over setup and electric kettle on top, mugs hanging from hooks on the wall above, and all my coffee supplies in two baskets underneath. The whole setup is functional, stylish, and totally unexpected.
The beauty of this location is that it frees up valuable kitchen space for actual kitchen stuff. Plus, if you work from home or have a home office near your entryway, you’ve just shortened your coffee commute. Every second counts before that first cup, you know?
Also Read: 15 Creative DIY Coffee Bar Ideas for Small Spaces
11. Bar Cart Coffee Corner
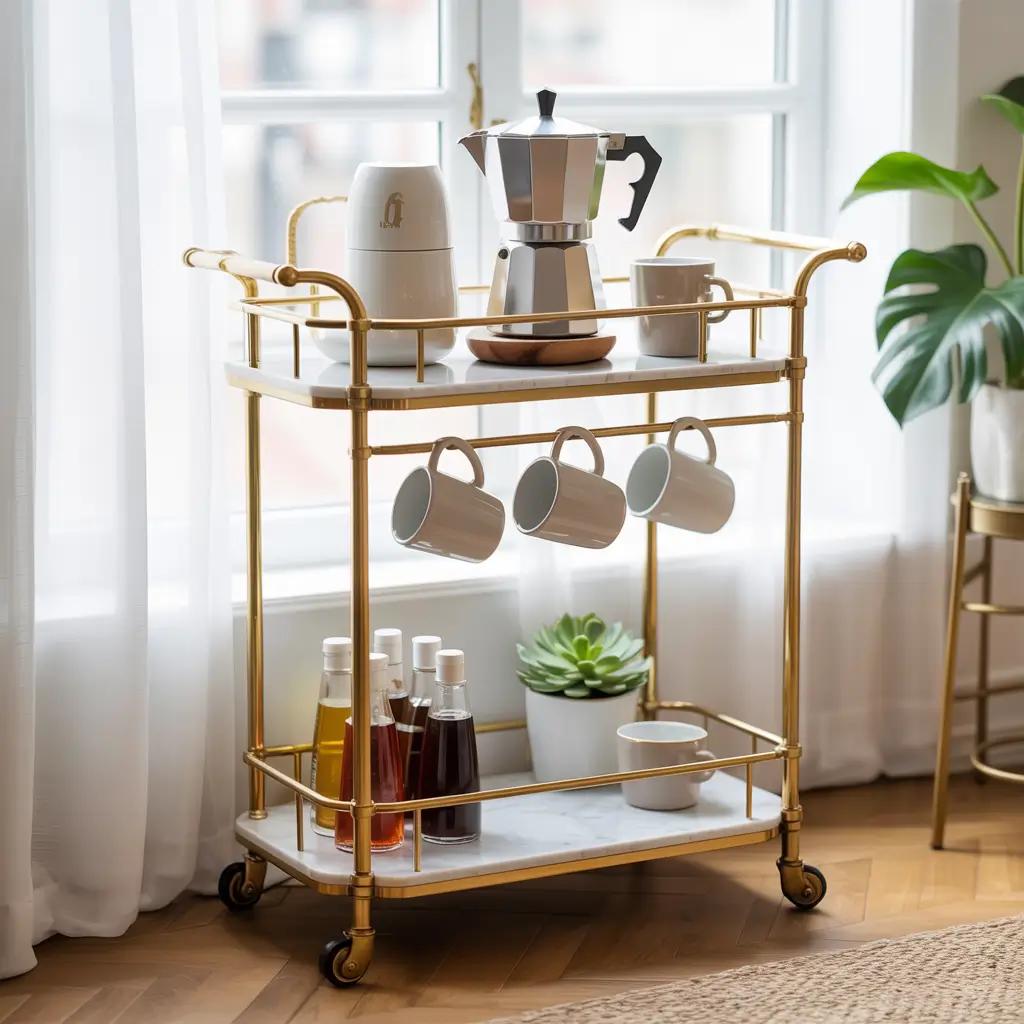
Bar carts aren’t just for alcohol anymore. Actually, I’d argue they make better coffee stations than they do bars.
I bought a two-tier bar cart from a thrift store for $15, gave it a quick spray paint makeover, and created the most versatile coffee station I’ve ever owned. Bar carts have this fancy, put-together vibe that makes your coffee setup look intentional and chic.
Why bar carts work so well:
- Wheels for mobility: Roll it wherever you need it, then tuck it into a corner or against a wall
- Multiple levels: Most bar carts have 2-3 tiers for organizing different coffee elements
- Built-in handles: The side handles on many bar carts are perfect for hanging mugs or small utensil holders
- Style factor: They just look good—vintage brass, modern gold, industrial black, whatever your vibe
My bar cart coffee corner has my espresso machine on top, milk frother and syrups on the middle shelf, and backup supplies on the bottom. I added some S-hooks to the handle bars to hang my favorite mugs. The whole thing looks like something out of a design magazine, but it cost me less than $50 total.
Pro tip: Add a small tray to the top tier to corral small items like sugar packets, stirrers, and coffee scoops. This keeps everything contained and makes the cart look more curated. Also, if you’ve got hardwood floors, put felt pads on the wheels—you’ll thank me later when you’re not leaving scratches everywhere.
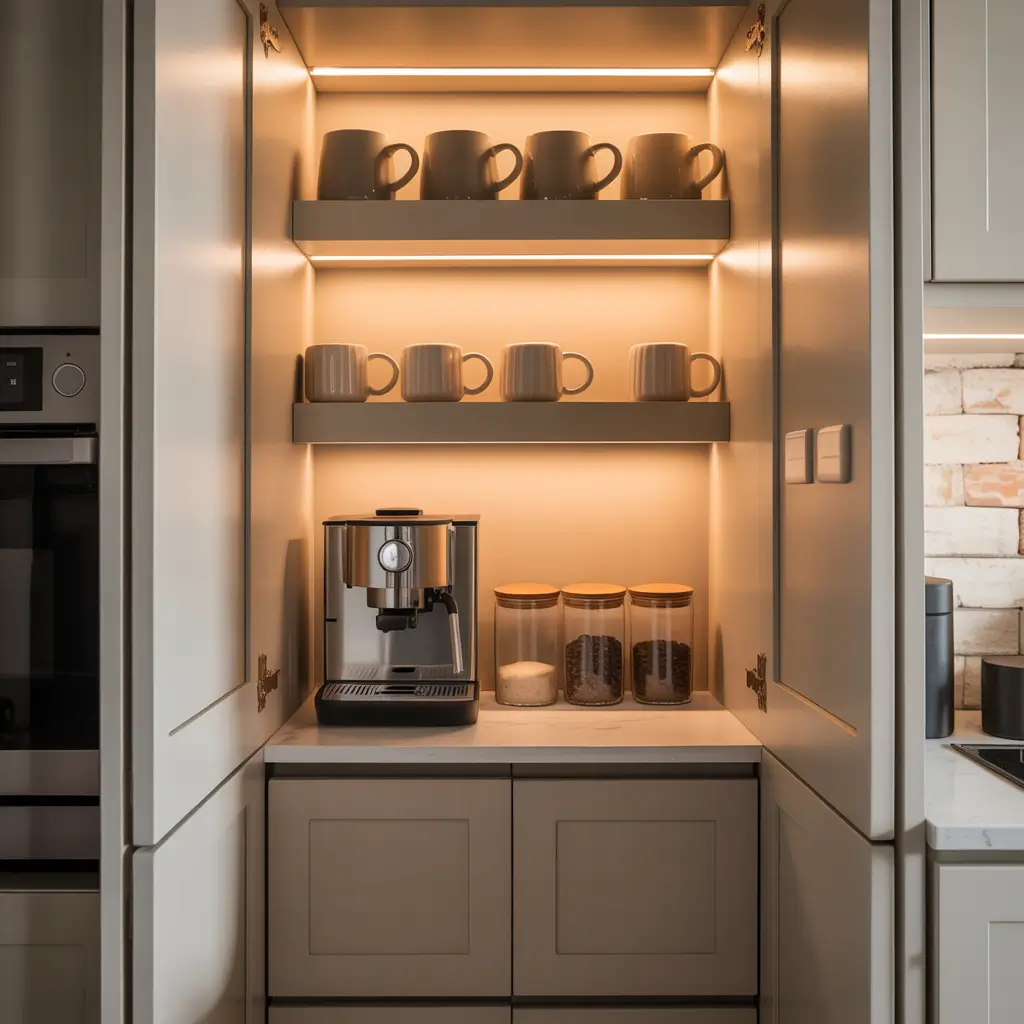
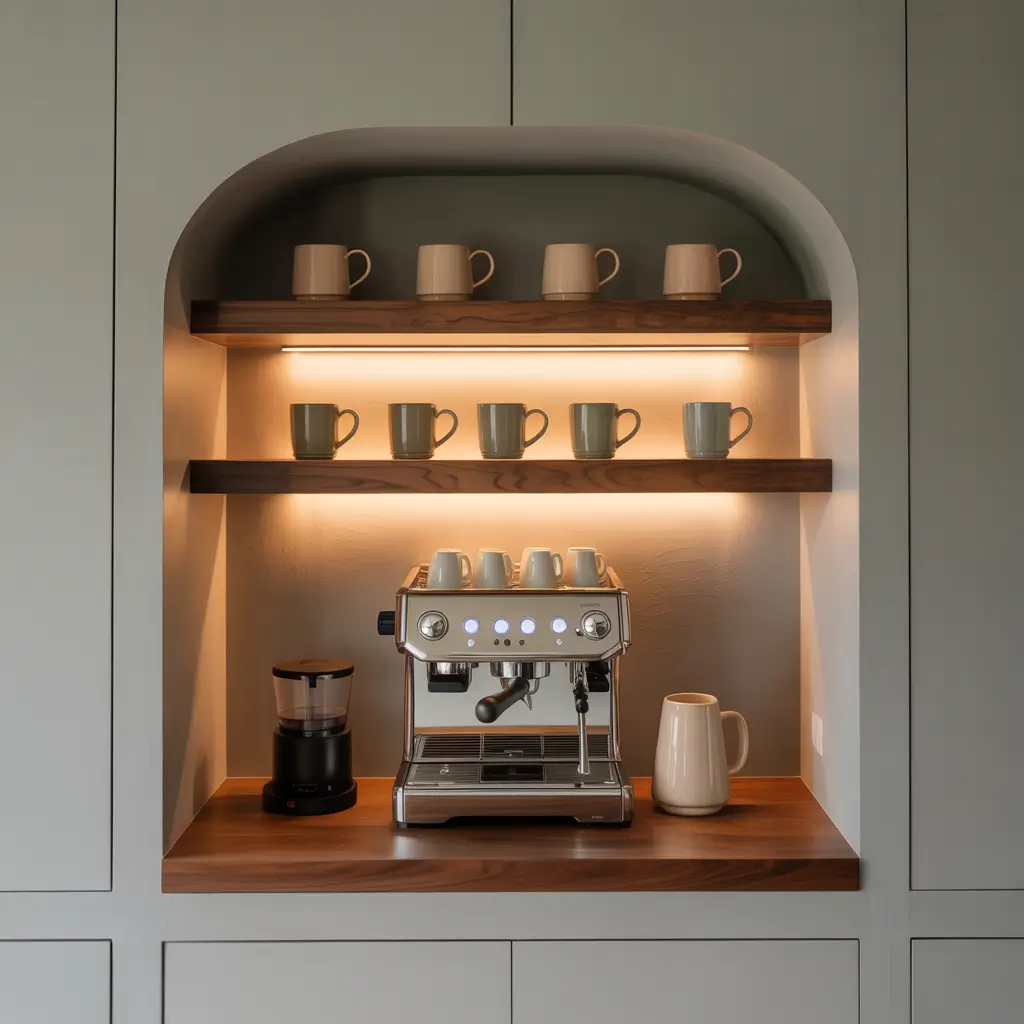
12. Built-In Coffee Bar Cabinet
Alright, this one requires a bit more commitment (and maybe some power tools), but hear me out.
Built-in coffee bar cabinets are the permanent solution for people who know they’re staying put for a while. I helped my best friend install one in her tiny condo, and the added home value alone made it worth the effort. We converted an awkward nook into a custom coffee cabinet that looks like it was always meant to be there.
Here’s what goes into a built-in coffee bar:
- Recessed or alcove space: Look for unused nooks, spaces between studs, or even shallow closets
- Custom shelving: Build or install shelves specifically sized for your coffee equipment
- Doors or curtains: Add cabinet doors or a tension rod with a curtain to hide everything when not in use
- Electrical outlet: Make sure you have power access—this might require an electrician
We built my friend’s setup in a 24-inch-wide alcove that was previously just empty wall space. We added three shelves, painted the interior a contrasting color, and installed a tension rod with a café curtain. The whole project cost about $80 in materials and took a weekend to complete.
The result? A coffee bar that looks like a professional designer installed it, but it was totally DIY. The built-in nature means zero floor space used, and the custom sizing means every inch is optimized for her specific coffee gear.
Obviously, this option isn’t for renters (unless you’ve got a very cool landlord), but if you own your space and want a permanent solution, built-ins are unbeatable.
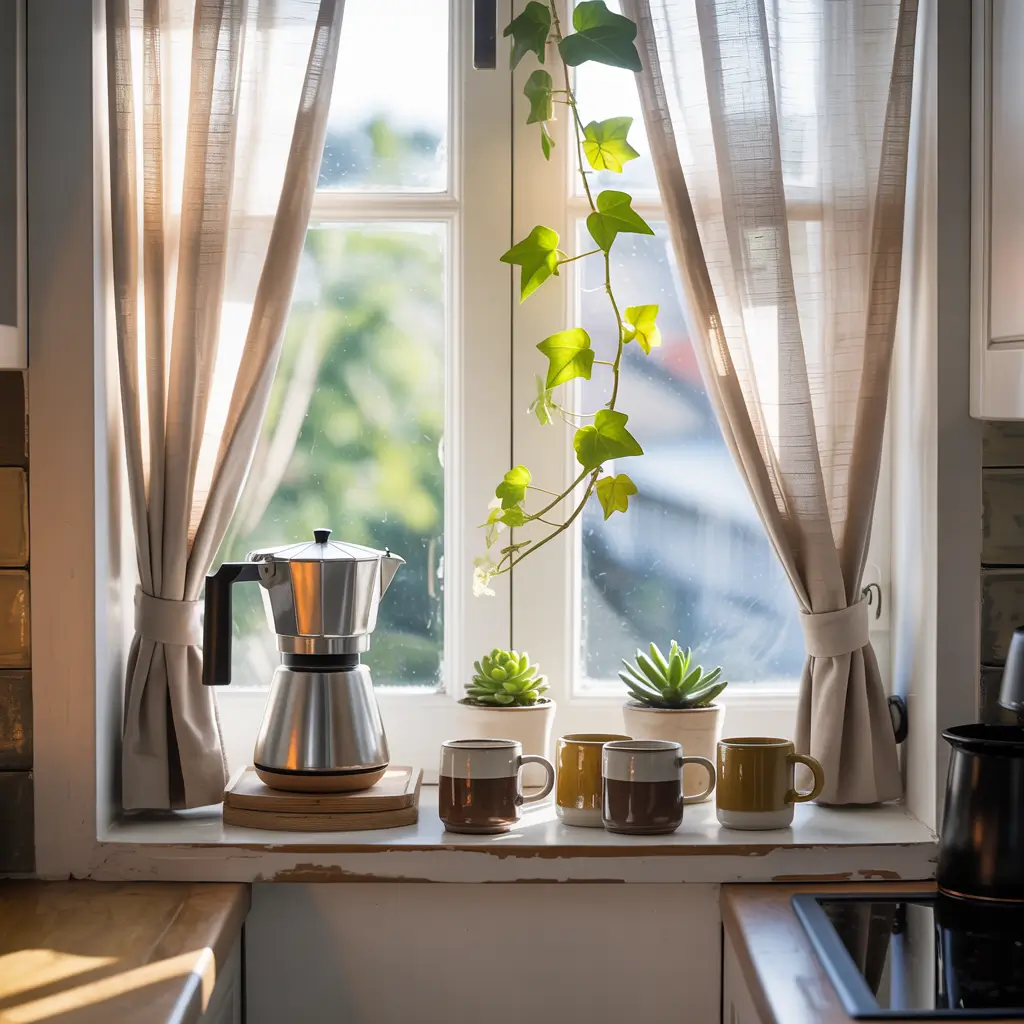
13. Windowsill Coffee Station
Let me tell you about the most overlooked coffee bar real estate in your home—your windowsill.
I set up a windowsill coffee station in my last place, and it was surprisingly perfect. Most windowsills are 4-8 inches deep, which doesn’t sound like much, but it’s enough for a simple coffee setup. Plus, you get that natural morning light while you’re making your brew. Kind of poetic, honestly.
Here’s how to work with a windowsill:
- Depth check: Measure your windowsill—you need at least 6 inches to make this work
- Compact equipment: This setup works best with manual brewing methods like pour-over, French press, or Aeropress
- Nearby power: You’ll need an outlet close by if you’re using an electric kettle
- Sun protection: If your window gets harsh direct sunlight, be careful about storing coffee beans there—light degrades coffee
My windowsill setup was super minimal: French press, small electric kettle on a trivet (windowsills can get hot), and a little ceramic container for coffee grounds. My mugs hung from hooks I installed on the wall beside the window, and I kept my beans in an opaque container in a nearby cabinet.
The morning light made the whole coffee-making process feel special. I’d wake up, open the curtains, and make my coffee while looking out at the sunrise. It sounds cheesy, but those little moments made a huge difference in my daily routine.
Just watch out for heat issues—don’t store anything heat-sensitive directly on a windowsill that gets full afternoon sun. And obviously, make sure your windowsill is stable and well-installed before you start loading it up with equipment.
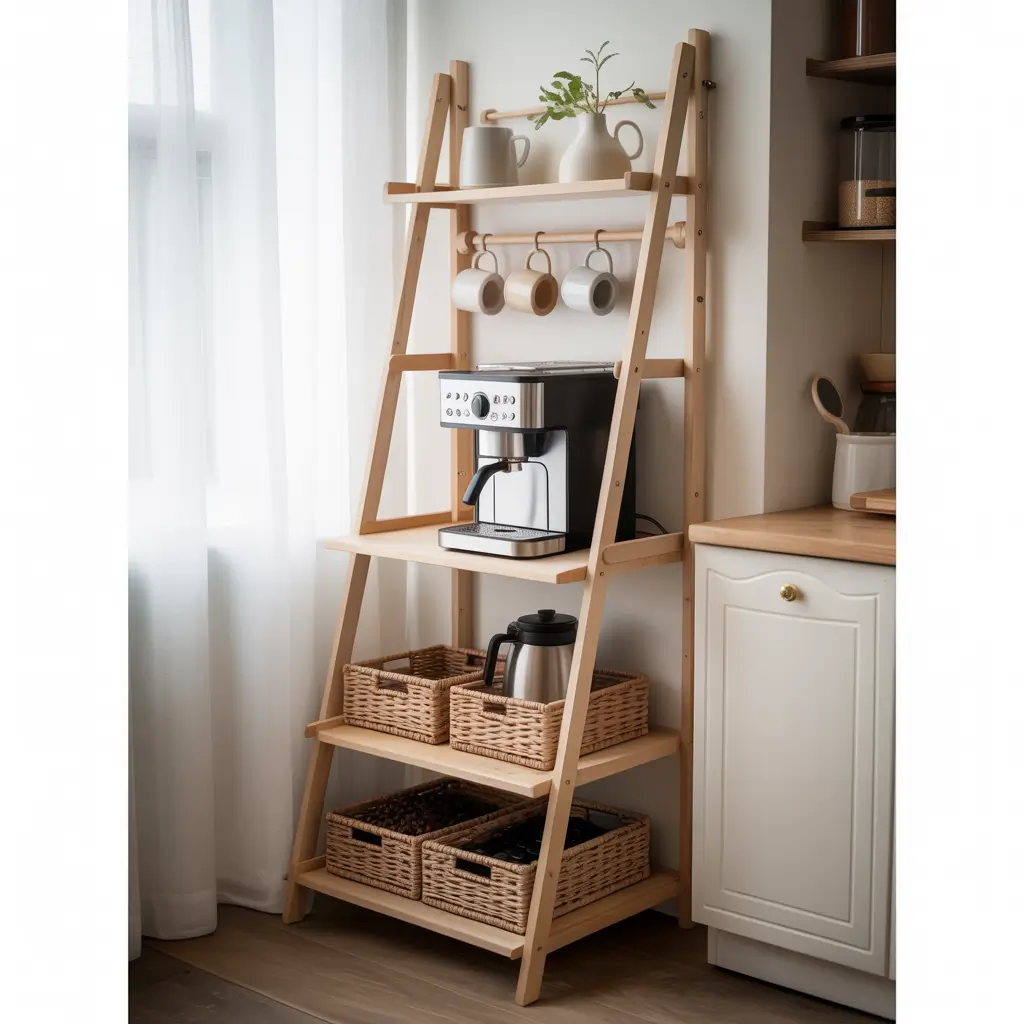
14. Ladder Shelf Coffee Bar
Ladder shelves are having a moment, and for good reason. They’re stylish, space-efficient, and surprisingly functional.
I furnished my entire studio with ladder-style furniture, including my coffee station. A ladder shelf leans against the wall, taking up minimal floor space while providing multiple levels of storage. It’s like a vertical cart that doesn’t move—and it looks way more expensive than it actually is.
Why ladder shelves work for coffee bars:
- Small footprint: The angled design means they only touch the floor at the base—maybe 12-18 inches of floor space
- Multiple tiers: Most ladder shelves have 3-5 shelves, perfect for organizing different coffee station elements
- Open design: Everything’s visible and accessible, no digging through cabinets
- Aesthetic appeal: They have that trendy, industrial or farmhouse look that makes your space feel curated
I organized mine from top to bottom: decorative items and backup supplies on top (since it’s hard to reach), coffee beans and syrups on the middle shelves, coffee maker and everyday items on the lower shelves, and mugs in a basket on the bottom shelf. The graduated shelf sizes naturally guide how you organize, with the smallest items on top and larger items below.
One thing to watch: stability matters. Make sure your ladder shelf is secure and won’t tip forward when you’re pulling items off the upper shelves. Many come with wall anchors—use them. I learned this the hard way when I reached for my coffee beans and nearly brought the whole setup crashing down. Not my finest moment, but we all survived.
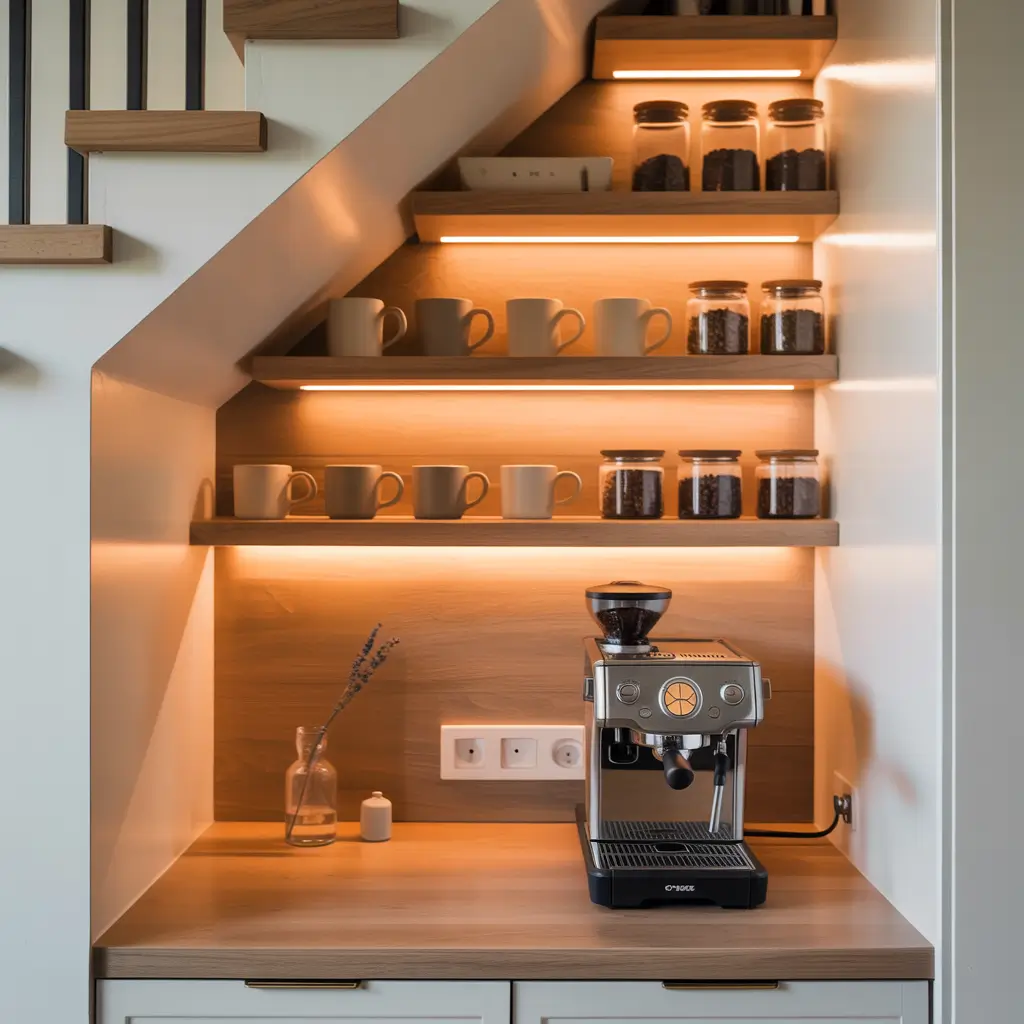
15. Under-Stairs Coffee Bar Setup
Got stairs? Then you’ve got coffee bar potential.
Under-stairs spaces are the ultimate unused real estate. Most people just shove random storage boxes there and call it a day, but I turned mine into a fully functional coffee nook, and it’s hands-down the coolest use of space I’ve ever created.
Here’s the under-stairs coffee bar strategy:
- Measure the space: Under-stairs areas are usually triangular, so you’ll need to work with varying heights
- Custom or modular shelving: Install shelves that follow the slope of the stairs, or use modular units that fit the space
- Lighting: Under-stairs areas are usually dark—add battery-powered LED strips or a plug-in lamp
- Make it cozy: This is a unique space, so play it up with some wallpaper, paint, or decorative elements
I used the tallest part of my under-stairs nook for my coffee maker and grinder (needed about 16 inches of clearance), then added progressively shorter shelves following the staircase slope. The lower end holds mugs, small containers, and decorative items. I added some peel-and-stick wallpaper and a battery-powered light strip, and the whole thing looks like a secret coffee speakeasy.
The best part about under-stairs coffee bars is that they’re conversation starters. Every single person who visits asks about it because it’s unexpected and creative. You’re taking dead space and turning it into something awesome—that’s the whole point of small-space living, right?
Just be mindful of building codes if you’re modifying anything structural. And make sure you’re not blocking access to anything important (like electrical panels or plumbing shut-offs) that might be hiding under there.
Making Your Small Space Coffee Bar Work
Look, I’ve thrown a lot of ideas at you, and maybe you’re feeling a bit overwhelmed. That’s totally normal. The key is picking the solution that fits your specific space, budget, and coffee habits.
Start by evaluating your space honestly. Walk around your home with a tape measure and actually look at the forgotten corners, empty wall spaces, and underutilized furniture. You’ve probably got more options than you think.
Then consider your coffee routine. Are you a quick single-cup person who just needs a Keurig and some pods? A ladder shelf or floating shelves might be perfect. Are you a serious pour-over enthusiast with multiple brewing methods? You might need a cabinet conversion or a rolling cart with more storage.
Budget matters too. Some of these ideas cost $20 and an hour of your time (hello, IKEA hacks). Others might run you a few hundred dollars and require some DIY skills. Be realistic about what you’re willing to spend and what you’re capable of building or installing.
And here’s the thing nobody tells you about small-space living: you have to be willing to edit. You can’t keep every single coffee mug you’ve ever owned, every flavor syrup you thought you’d use, and five different coffee makers. Part of creating a functional small-space coffee bar is curating your collection down to what you actually use.
I went through this process, and it was honestly liberating. I kept my six favorite mugs, got rid of the fancy espresso machine I never used, and consolidated all my random coffee accessories into one small drawer organizer. Less stuff means less stress, and my coffee bar actually functions better now than when I was trying to cram everything into it.
Final Thoughts
Creating a coffee bar in a small space isn’t about compromising—it’s about getting creative. I’ve lived in studio apartments, tiny houses, and cramped condos, and I’ve never gone without my dedicated coffee station. It’s too important to my morning routine, my sanity, and honestly, my will to function as a human being.
Every single idea I’ve shared here comes from real experience—either my own setups or ones I’ve helped friends and family create. Some worked better than others (the windowsill situation was better in theory than practice during summer, not gonna lie), but they all proved one thing: you don’t need a lot of space to have a great coffee bar.
So pick the idea that speaks to you, measure your space, and make it happen. Your mornings will thank you. Your coffee ritual deserves a home, no matter how small that home might be. And who knows? You might discover that working with constraints actually makes you more creative and intentional about your space.