How to Turn IKEA Wardrobes Into Built-In Closets (Step-by-Step Guide)


The first time I walked into our bedroom after the previous owners cleared out, I just stared at the wall where their wardrobe used to be. There was this rectangle of slightly cleaner paint, a few stray screw anchors, and an outlet at a height that made no sense. And I knew right then I wanted built-ins along that whole stretch. The problem was, I’d been quoted around eight grand for proper carpenter-built closets, which, no. So I did what half the internet seems to do now and went the IKEA built-in closet route. Did it work? Yeah, mostly. Would I do a few things differently? Also yeah.
Anyway. Let me walk you through it the way I wish someone had walked me through it.
Planning and Measuring (Yes, Actually Measure)
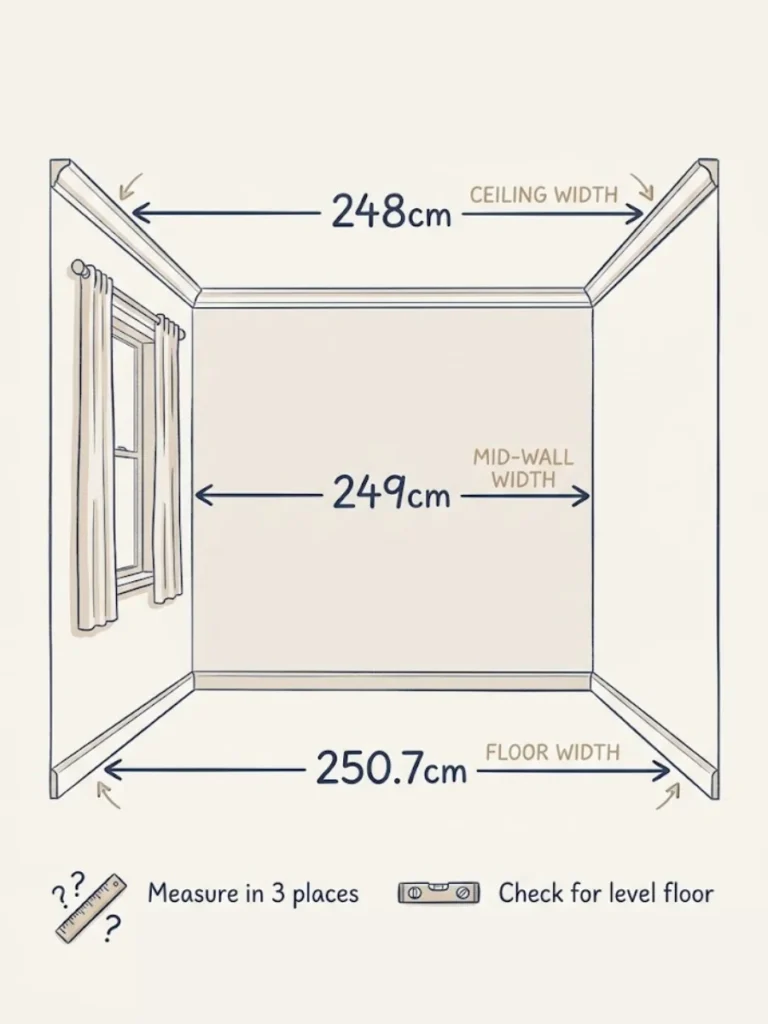
I’m going to be annoying about this for a second because it’s the part everyone skips and then regrets at 11 PM on a Saturday with three boxes opened. Measure the wall in at least three places. Top, middle, bottom. Old houses lie. New houses lie too, just differently. My wall was 2.7 cm wider at the floor than at the ceiling, which doesn’t sound like much until you’re trying to slot a wardrobe frame into a space that’s narrower than the box says.
Also measure the ceiling height in multiple spots, because if you’re going floor-to-ceiling (and you should, that’s what makes it look built-in instead of like a wardrobe shoved against a wall), the difference of even a centimeter matters when you’re cutting trim.
Things I’d recommend sketching before you buy anything:
- The wall width in three places
- Ceiling height in three places
- Where outlets, vents, and any baseboard heating sit
- Window and door clearance, including how far doors swing open
- Whether your floor is level (spoiler, it’s not)
Don’t trust the IKEA planner alone. It’s useful, but it draws on a perfectly flat, square wall, and yours isn’t one. I used the planner to get a feel for layout, then redrew the whole thing on actual graph paper with my real wall measurements. Old-school. Worked.
PAX vs KALLAX, the Honest Take
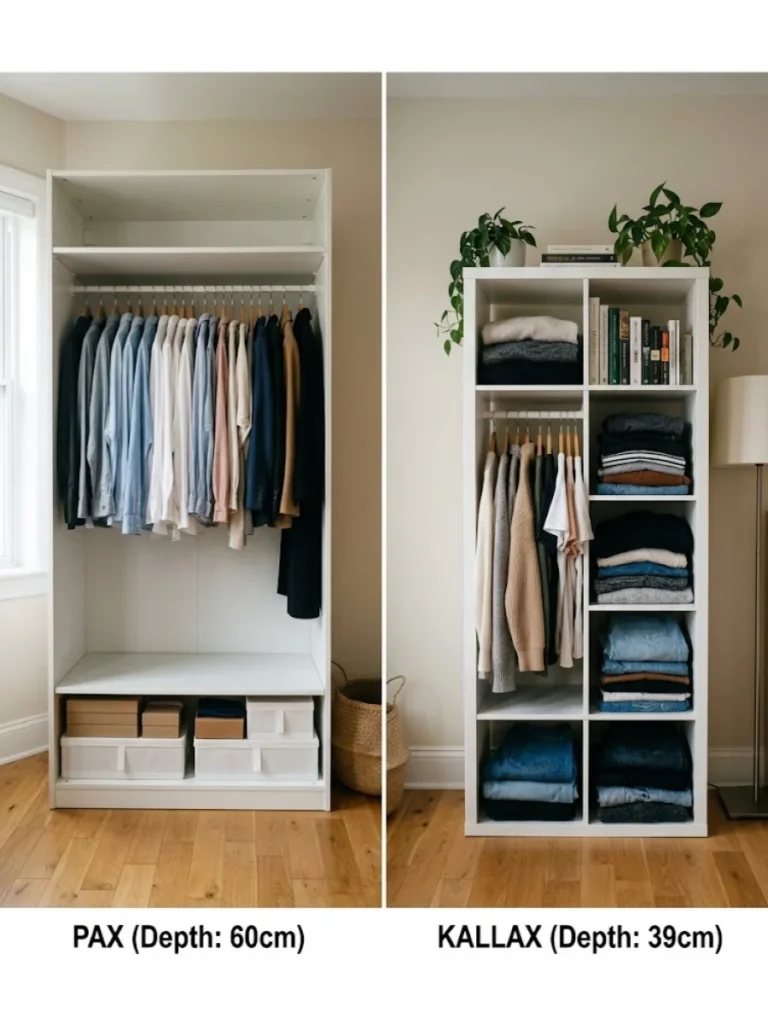
PAX is the obvious choice. It’s literally built to be a wardrobe system, it goes up to 236 cm, and there are filler pieces and trim accessories that exist for this exact purpose. If you want a true IKEA built-in closet, PAX is what you want. The 100 cm wide frames are the workhorses. 75 cm and 50 cm fillers help you hit weird wall widths.
KALLAX is where people get into trouble. I see Pinterest boards full of “KALLAX built-in wardrobe DIY” and I’m always like, friend, that’s not a wardrobe, that’s a cubby unit you’ve draped a curtain over. KALLAX can work as part of a closet setup, especially as a lower bench or shoe section under hanging clothes, but as the main wardrobe? You lose hanging height, the depth is wrong (39 cm vs PAX’s 58 cm), and clothes on hangers do not fit properly. I tried it in our first apartment. It was fine for sweaters folded flat. Coats and dresses, no.
So my actual answer is: PAX for the bulk of the build, maybe KALLAX integrated if your layout calls for it. Don’t try to fake a full PAX wardrobe hack with KALLAX. You’ll be unhappy.
Filler Panels and Trim, the Actual Built-In Look
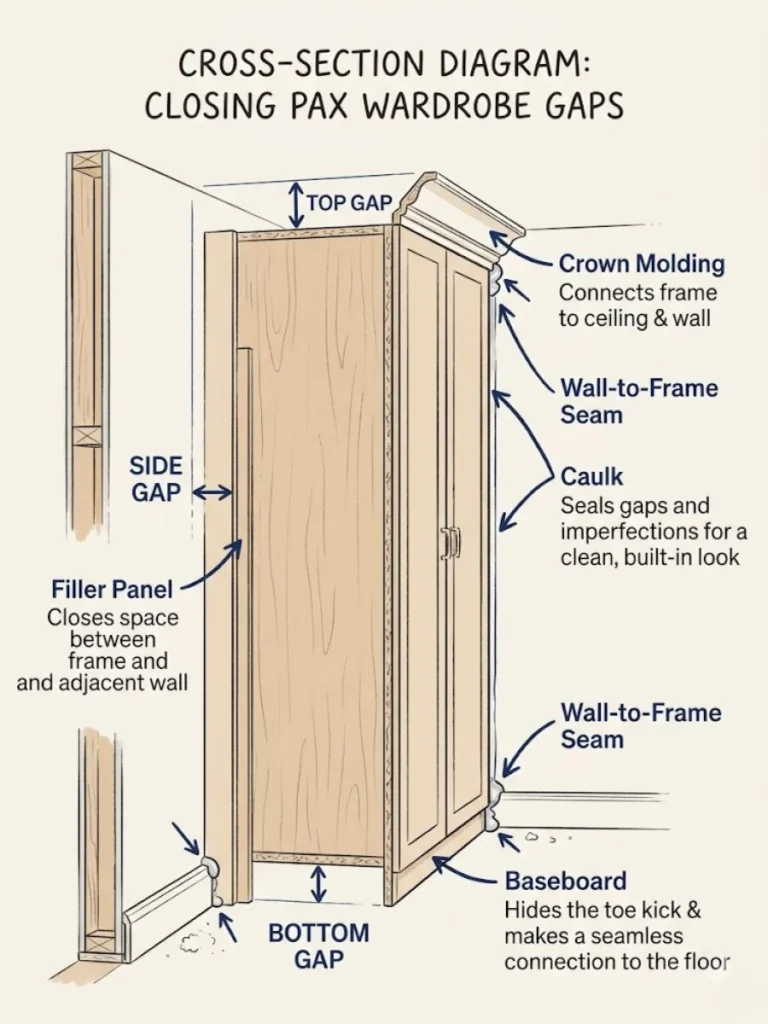
Okay, here’s where the magic happens, and also where most DIY built-in wardrobe projects fall apart visually. A PAX frame on its own is a box. It has a noticeable gap between the box and the wall, between the box and the ceiling, and between two boxes if you put them side by side. Those gaps are why people can tell it’s an IKEA wardrobe from across the room.
The wardrobe built-in look comes from closing every one of those gaps.
You’ll need:
- Side filler strips for the gap between the PAX frame and the side walls
- Top cornice or crown molding to close the ceiling gap
- Baseboard or kickplate at the bottom to match the rest of your room
- A scribe panel or two if your walls aren’t square (more on this in a sec)
IKEA sells a finishing accessory called KOMPLEMENT for top cornice and side mouldings. I used it. It’s fine. It’s also pretty thin and obviously veneered if you look up close. What I’d suggest, and what I did on the second wall, is use IKEA’s frame as the box but buy your trim and crown from a regular hardware store and paint everything together. It costs maybe forty dollars more total and looks dramatically better. The trim is also chunkier, which makes the whole thing feel more architectural and less like flat-pack furniture wearing a hat.
For the baseboard, match whatever’s already in your room. If you have a 12 cm baseboard everywhere else, your closet base should be 12 cm. This is the detail that sells the IKEA closet to built-in transformation more than anything else. People’s eyes track the baseboard line around a room without realizing they’re doing it. If yours breaks at the closet, the spell breaks.
Scribing to a Wall That Isn’t Straight
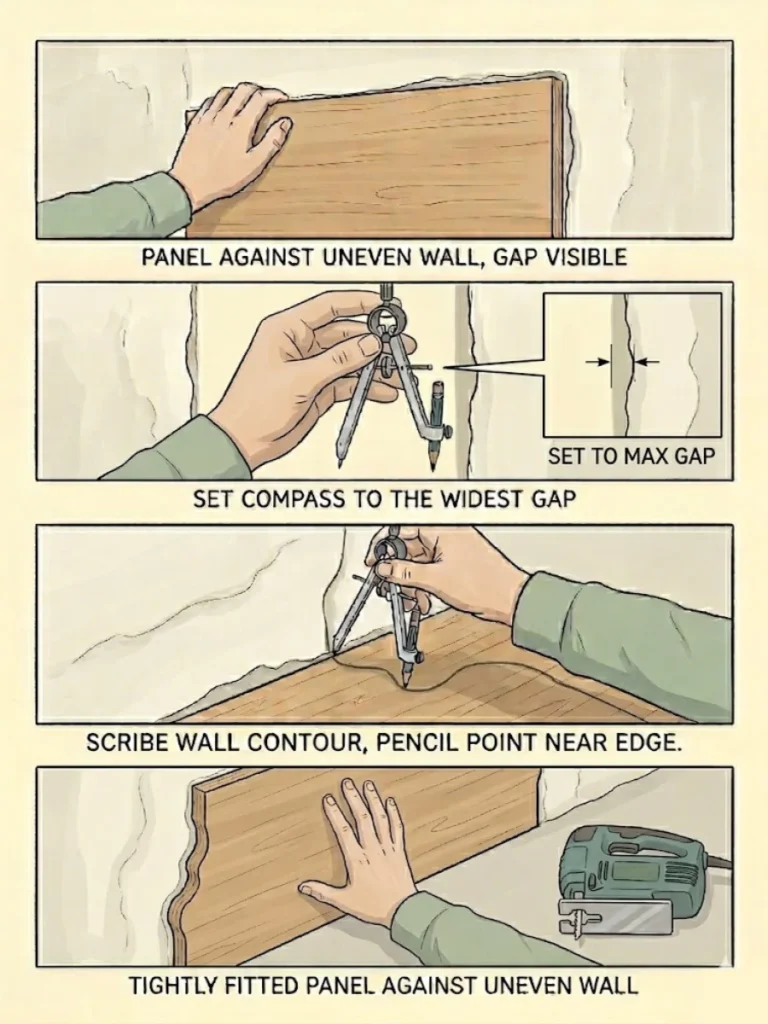
So your wall isn’t straight. Mine wasn’t. I’d say maybe 5 percent of walls in real homes actually are. Scribing is how you make a straight panel sit flush against a wonky surface.
The way it works: you push your filler panel or side piece up against the wall as close as it’ll go, you’ll see a gap somewhere along the length, and that gap is what you transfer onto the panel with a compass. You set the compass to the widest point of the gap, run it down the wall edge, and it traces the wall’s profile onto the panel. Then you cut along that traced line, usually with a jigsaw, and now your panel matches your wall.
It sounds harder than it is. Honestly, the first one I did took me about an hour because I kept second-guessing the line. The next two took fifteen minutes each. You’ll get a feel for it. The trick is to do the scribing on the filler strips, not the wardrobe frame itself, because the filler is cheap and replaceable and the frame is not.
One thing nobody warns you about. If your ceiling slopes (mine drops about 1.5 cm across the wall), you scribe the top trim the same way. I didn’t realize this until I’d already installed the cornice and noticed a slow widening gap on one end. Took it down, scribed it, put it back. Annoying but fixable.
Paint Matching and Finishing
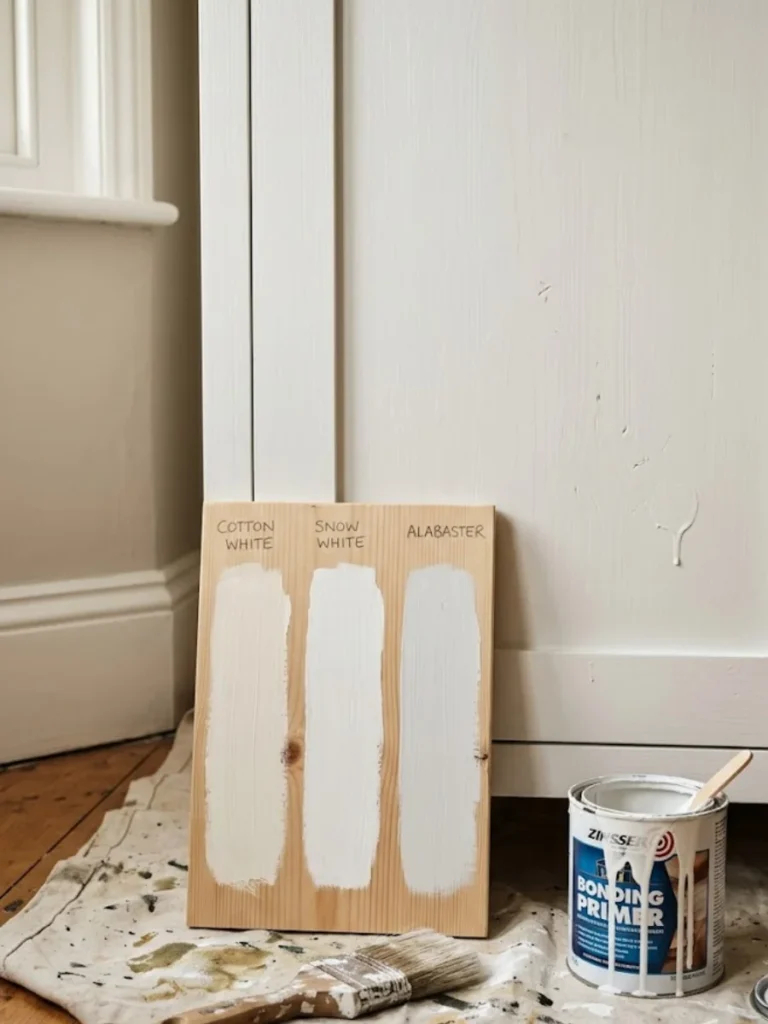
This is the step where most people stop early and you can tell. The IKEA finish is a smooth, slightly plasticky white that doesn’t quite match any wall paint. If your walls are warm white and your PAX is cool white, the contrast under daylight is real.
What I did: primed the visible exterior surfaces (sides, top filler, trim, anything not the actual inside of the wardrobe) with a bonding primer made for laminates. Then two thin coats of the same paint as my wall trim. Same color, same sheen. The inside of the wardrobes I left as-is, because you don’t see it once clothes are in.
If you don’t want to paint, at least caulk every seam between the wardrobe and the wall and ceiling before you decide. Caulk alone, with no paint, already does about 60 percent of the work in making things look built-in.
Budget, Honestly
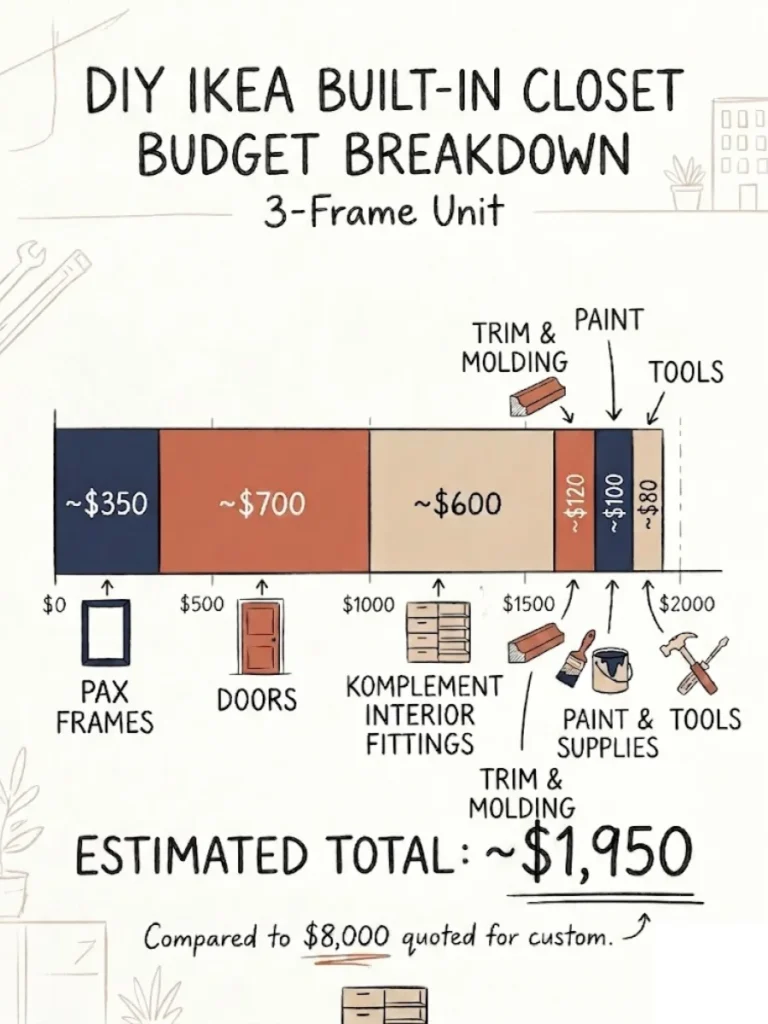
I see people online claim they did a full IKEA built-in closet for $600. I don’t believe them, or they had three frames and one door. For our setup, which was three 100 cm PAX frames plus doors, hardware, all interior fittings, all trim, primer, paint, and caulk, the real number came out to right around $1,950. Could’ve been less if I’d skipped the soft-close hinges. Could’ve been more if I’d done glass doors.
The places budget creeps:
- Interior fittings. The drawers, pull-out trays, and pant hangers add up fast. Each KOMPLEMENT drawer is roughly $50 to $80 depending on style.
- Doors. The doors are often more than the frames themselves.
- Tools you didn’t realize you needed. I bought a small jigsaw for this project. Worth it. But it’s $80 you didn’t plan for.
Still, $1,950 vs $8,000. I’ll take the weekend of swearing.
A Couple Mistakes I’ll Just Admit To
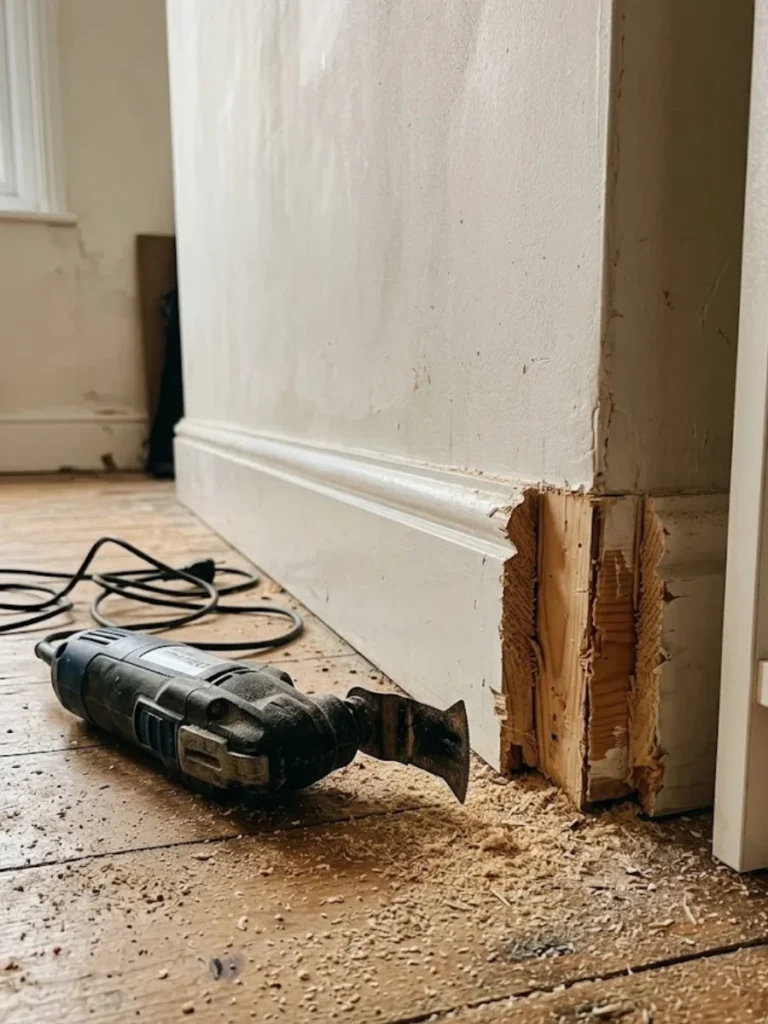
I forgot to account for the baseboard already attached to the wall. PAX frames are designed to sit flush on the floor, but my existing baseboard meant the frame couldn’t push all the way back against the wall. I had to cut out a notch in the baseboard behind each frame, which involved an oscillating tool and a lot of dust. If I’d planned for it, I would’ve removed the baseboard first and reinstalled it after.
Also, I didn’t level the frames as carefully as I should have on the first one, and the doors had a slightly off gap at the top. PAX frames have adjustable feet for this exact reason. Use them. Get a long level, not the little 30 cm one you found in a drawer. Your doors will thank you.
The closet’s been in for about two years now and it still looks great. Honestly the only person who can tell it’s IKEA is me, and only because I remember exactly which seams I caulked twice.


